www.go-7.co.uk

Home Page

Build Diary 2005

Build Diary 2004


Vans RV7 2006/2007/2008 Build Diary
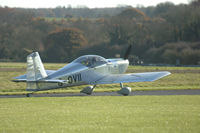
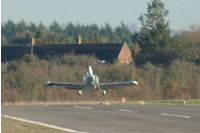
After 20 months of building, G-OVII lifts off - 13:40 on 18th November 2006 - into the air for the first time. The sight was incredible as almost two years of work came together. Read all about it here.

Starter problem.
23rd February 2007
I come home on Friday to find the Permit to Fly, that's it I have all the paperwork complete and can fly my RV!
13/14/15th January 2007
This weekend I finally completed the test flying. Sunday I completed all the paperwork and Monday it was posted to the PFA. Now all I have to do is wait........
9th January 2007
The weather is driving me nuts! Here I sit updating my site still unable to do the last 30mins of the flight test. I had one day since 10th December when the weather was clear enough to fly and I happened to be in Birmingham that day. Since then if the day has not been raining or low cloud then the wind has been far too strong.
9/10th December 2006
The alternator has been fixed for a few weeks but the weather has stopped 
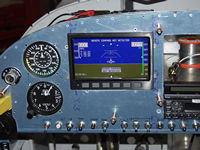
all test flying until this weekend. First flight was just 30mins to test the new alternator is working and set-up some more functionallity on the Dynon (D100). Second flight was the big two hr test flight and everthing went like clockwork. After downloading the engine data no problems showed up.
Test Flight with Bob Cole at the controls
RV flys for the first time !!! YES I AM IN THE AIR!!
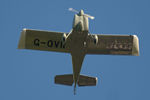
Almost exactly two years to the day I started work on the RV it takes to the air.
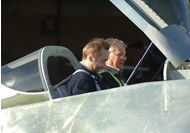
I didn't have any tailwheel experience. So I have been having some training at West London Aero Club(WLAC) at White Waltham with Bruce Hutton. He signed me off and I went solo on 4th October in their Super Cub G-WLAC.
Complex training I also needed constant speed prop experience. WLAC have an Arrow which Bruce suggested I do a full complex conversion (prop and retractable). After a thorough breif. Monday (9th-Oct) we climbed above the cloud - so I also had some instrument time - and Bruce went through all the prop and retractable sinario's. We returned to the circuit, did some landings where Bruce tried to catch me out by pulling the undercarrage CB.
3rd October 2006
Contacted the PFA about my permit to test - Engineer is on holiday for two weeks now.
Test Flight with Bob Cole at the controls
A really good day at the hanger today. Michael from Cambrai Covers came down to measure up for a travel cover and a future set of full covers. Late afternoon Alan came to do my weight and balance. I am pleased with the W&B figures. Miles also comes by and completes the final inspection..
Test Flight with Bob Cole at the controls
A few days working on getting the wheel spats alignment correct. Primed and layed some fiberglass to reinforce the fixing holes.
Empannage Fitting
Finally finished priming the cowl. Refitted this evening and brackets for wheel spats!
19/20th August 2006 - Pictures here (click 2006 Build Diary to get back here)
PFA Rally, Kemble. Rain again this year! !
Empannage Fitting
The last week of evenings I have been working on the cowls. I need to get some primer on them before the RV is flown to avoid oil getting into the fiberglass. As this will cause problems when they are painted.
Test Flight with Bob Cole at the controls
Busy Saturday so just Sunday in the hanger. Refitted the alternator then continued fitting the interior floor and panels. My new seats arrived in the week. Fitted carpet and seats - look really great! .
Test Flight with Bob Cole at the controls
INSPECTION Day - Miles my inspector came to check the RV over. Now I have a few things to sort out!!
Test Flight with Bob Cole at the controls
Took Wednesday off work to finish off some more jobs. Fitted park brake cable wrapped some more wires in position. Checked and torqued up bolts. Replaced one fuel line as it was too close to a cover. Fitted floor center cover, pax seat and the seat belts. My panel placards have not arrived so I have printed some temporary lables for a while. With the cowl fitted I ran the engine and went for a ride - taxi test - around the airfield Tested and bedded the brakes in. It was great fun!!! Took cowl off to check things over..
 
Test Flight with Bob Cole at the controls
Jason came down to the hanger and help put the registration on G-OVII (go-7 !) I also finished checking the aileron alignment & fitted the wing inspection covers.
Empannage Fitting
Saturday at the hanger, fitted lower rudder cover - now with strobe lamp. Fitted the seal around the airbox inlet - to lower cowl. Also fitted lower cowl to baffle floor seal.
25th July 2006
Mark helped me this evening - We removed the park brake and resealed all the connections, and refilled the brakes. While doing this I showed Mark the flap problem and in the process we spotted what the problem was. The last screw on the wing joint trim was catching on the flap. I unscrewed it - half way out - and the flap worked. So this evening both problems appear to have been fixed.
Empannage Fitting
Mark the spark came and helped me in the hanger on Friday. We fitted the new control panel and refitted all the egine controls. We then spent a lot of time trying to bleed the brakes. Sunday Finally it came time..... TO START THE ENGINE ...... Jo & I moved the RV out of the hanger. The engine started first time easily and ran for a short while - it stopped and I realised I had selected the tank that I had drained!! So I took this chance to check the engine for leaks. I had one on the oil cooler, the joint was loose so I tightened it and restarted the engine - with some fuel this time! The engine ran well and I checked the Advanced Engine monitor settings. I stopped the engine, climbed out and was greated by an excited Jo leaping around excited about how well it had gone.
Empannage Fitting
Some preparation work in the garage this week ready for another hard long weekend. Tuesday evening I went to the hanger to get the engine control panel off so I could make a new one. To reposition the throttle to ensure it is clear of the control column. Also fitted the top cowl oil door and top coat painted the new control panel, spar/floor covers & fuel boost pump cover.
Empannage Fitting
Saturday and Sunday at the hanger. Started by fitting the wing tips I had been working on during the week. I then had to empty the fuel tanks - I had filled them calibrating the fuel guages and forgot I need them to be empty for the weight and balance to be performed.Fitted rudder and elevators, HS end caps and VS top cap. I also discovered a fuel leak on the right wing tank. The fuel sender was leaking, so had to reseal it. Run update on Dynon D100. Fitted and wired elevator electric trim. Connected and adjusted the elevator control, and discovered the control stick hits the throttle control. Fitted wing to fuse cover on left side, didn't fit right side as I need to check the tank is not leaking. Riveted the internal spar fuse brace.
Test Flight with Bob Cole at the controls
Fitted top rudder cap and elevator end caps.
At the hanger early Saturday morning and worked all day then back home to the workshop to complete a few jobs on the bench.
Test Flight with Bob Cole at the controls
Back from holiday, the project is at the hanger but I still have some jobs to complete at home. I had planned the move to the hanger carefully to ensure I had some jobs I could complete at home.
 
Empannage Fitting
The BIG move, I have moved the RV to the hanger and fitted the wings.
Test Flight with Bob Cole at the controls
13th June 2006
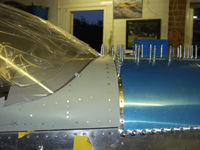
Fitting and filling the horizontal and vertical stabalizer end caps.
Test Flight with Bob Cole at the controls
Fitting the spinner to prop & filler plates.
Empannage Fitting
Removed the engine baffles and completed a few jobs on them - nutplates for ignition lead grommets & cut blast tube holes for mag's and alternator.
Test Flight with Bob Cole at the controls
Started installation of Trio EZ Pilot servo in wing (drilled parts and primed - fit later) Jo helped rivet the skin. I bucked and Jo operated the rivet gun. She did a great job the rivets are really tidy without any marks on the skin. Also fitted tail wheel today, the RV is on all it's wheels now.
Empannage Fitting
Started to rivet top skin into place - this is the last skin to be fitted! Jo is going to help with the riveting as it's not possible for me to do it on my own. Sealed fuel tanks and fitted the fuel float sender - instead of using proseal I used Stag Wellseal, this will not dry hard and will enable the covers to be removed for inspection if necessary.
Test Flight with Bob Cole at the controls
I took a day off work today, and my order from SafeAir1 arrived - with my Trio EZ Pilot. Lots of jobs completed today.
Empannage Fitting
A few odd jobs this eveing. Prepared the fuel tank senders ready for fitting. Put some paint on the canopy to help see how smooth I had finished the resin work. Fitted tank brace to fuse and riveted Gretz mount into wing.
Empannage Fitting
I had originally decided to install the pitot as in the Vans manual. However after getting the Dynon D100 EFIS I decided to add the AOA (Angle of Attack) functionallity. This necessitated me installing the Dynon pitot with the Gretz mount. I thought it was going to take longer as I had the skin already installed. I completed most of the installation in one evening.
Test Flight with Bob Cole at the controls
3/4th June 2006 Picture
Went to the RV Fly-in at LaBaule France.
Test Flight with Bob Cole at the controls
As I have been working on the cowl fiberglass I decided to do some work on the leg faring.
Bob & I taxi for runway 25 at Thruxton
Bob & I strap in for the second flight
Second take off, quick & rapid climb
Test Flight with Bob Cole at the controls
The mixture control John sent arrived today, and I fitted it. Another issue solved. Trimmed down the air inlet on cowl and FAB air box. Trial fitted. Also connected alternate air control.
Empannage Fitting
Worked on the cowl air intake today. The intake needs to be made level with the inner part of the cowl - just above the intake. This is to allow the air filter box to fit better. I have noticed some builders have not extented the intake, I almost didn't as I was able to make the air box fit. But decided today to do the extension as per plans.
Test Flight with Bob Cole at the controls
Just a few hours in the workshop this afternoon. Fitted the fuse holders for the starter warning lamp and the alternator warning lamp. Fitted the baffle seal to one side of the front of cowl.
Empannage Fitting
The connectors I have been waiting to arrive to connect the flap indicator (and warning lamps) arrived today. So I was able to complete the flap motor with indicator installation. Also wired in the starter warning lamp and the backup alternator warning lamp. As I was inside the cocpit I decided it was time to complete the aileron trim installation, and connect the control stick together.
Empannage Fitting
Back to working on the baffles..... Fitting the baffle seals, I had already made paper templates, it was now time to cut them out. I wanted to ensure the cowl fitted properly before I fitted the baffle seals, as they push on the cowl and make the cowl appear to not fit properly.
Empannage Fitting
Wired the flap motor and fitted the Ray Allen flap position sensor - wired to the Advanced AF-2500.
Test Flight with Bob Cole at the controls
This weekend I finished painting the instrument panel and fitted it back into the fuse this weekend. The project is really coming together.
Test Flight with Bob Cole at the controls
Painted instrument panel last night, so was excited to start work on it tonight - getting the instruments fitted. Then I remembered I needed to fit the map box. I had intended to rivet the box in place then apply a second coat on the panel. However after riveting the box in place I am unsure about repainting, what do you think, take a look at the last pictures in this page and tell me.
Empannage Fitting
Mixing jobs this evening. As I needed to spray some more primer I decided to do a few small jobs before I filled the workshop full of paint fumes. I layed up some more fiberglass and resin on the top cowl - by the inlets. Then I cut the second ignition lead holes in the baffles..
Empannage Fitting
Just a short day in the workshop today. I had some visitors - RV8 builder David and his wife. Then we went to the Popham RV fly-in. When I got back I finished fitting the ignition leads and (primer) painted the instrument panel.
Empannage Fitting
My order arrived from Aircraft Spruce this morning, it included a B&C (SD-8) backup alternator - it was quickly fitted.
Empannage Fitting
Continued working on the canopy perspex to frame. I am using West Systems Epoxy with microlite to fill the front.
Empannage Fitting
This weekend I decided to bite the bullet and bond the front of the canopy (the pespex to the front section of the canopy frame. I used West Systems epoxy - mixed with microfibre. See each picture for the stage text.
Empannage Fitting
Fitted rear canopy catches. I had fitted them before but I cound after painting there was a problem - just the layer of paint caused them to catch and jam the canopy! I became suck inside for quite a while. I finally managed to free myself just as Jo arrived to see where I had got to - not come in for dinner.
Test Flight with Bob Cole at the controls
Refitted after painting the canopy strut bracket. Fitted lock to canopy catch, dimpled top skin forward of canopy. This is the last skin to fit.
Empannage Fitting
Short day (Bank Holiday Monday) in the workshop. Tested all the electrics, radio & intercom. Also tested digital video recorder - Jo will be able to view films while flying!.
Busy weekend but I did manage to cut the heater and brake control cables to length.
Empannage Fitting
Continued work on wiring and instrument panel. Fitted starter warning lamp, and connector for GPS. Also fitted control cable for park brake and heater vent. Checked positioning of alternate air control.
25/26/27/th April 2006
Back to the wiring, fitted the EGT wires. Fitted the engine ground. Wired in 12v power pointo to both P1 & P2 positions to power noise cancelling headsets. Tidied wiring and fitted more P clips. I have also decided to fit a second backup alternator - B&C SD-8.
Test Flight with Bob Cole at the controls
A number of odd jobs this evening. Ran the wires for the EGT probes, fitted firewall ball joint for the prop control. Fabricated and fitted the fuel pump overflow, fitted the exhaust heat sheald. Fitted Heat muff to firewall control duct hose. Fitted clamps to engine breather. Adjusted top oil cooler hose outlet position.
Empannage Fitting
Just a quick hour in the workshop as I have visitors. Checking the cowl alignment and fitted eye ball grommets for the throttle, mixture and alt air controls.
Test Flight with Bob Cole at the controls
Fitted Cabin Heat Muff to exhaust, with the Superior IO-360 engine the exhaust is different to the Lycoming IO-360 engine. The muff position for the Superior engine is the same as the Carb Lycoming. This is also why I positioned the inlet air ar the rear of the baffles rather than the front baffle floor Also worked on cowl fitting.
Test Flight with Bob Cole at the controls
Bonded hinge to upper and lower cowl. Used West System Epoxy Resin to bond the hinge to the cowl and riveted into place. Also modified the front baffles for the upper cowl inlet ducts.
Test Flight with Bob Cole at the controls
Fitting the air box to the fuel injection servo - had a break between to go to Sun N Fun in Florida.
Empannage Fitting
A whole day in the workshop, worked on the baffles. Completed each corner and started to rivet together.
Test Flight with Bob Cole at the controls
In the workshop this afternoon continued work on the baffles. Made spacer, brackets and joddled joint.
 
Test Flight with Bob Cole at the controls
Baffle work around the oil cooler, riveted the parts together.
Test Flight with Bob Cole at the controls
After a bad weekend - Aircraft stuck at RAF Halton, TV blows up, then Monday heavy winds blow the fence down. Finally I have managed to get back on with the RV. Cowl and baffle work. The cowls have been on and off while I have checked the baffle positions and trimmed to get the gap correct. With the gap correct I have been able to start fitting the oil cooler.
Empannage Fitting
Not much work on the project this weekend. I had to collect my Cessna from the engineers on Saturday. However bad weather cause me to have to land at RAF Halton (the weather was still bad on Sunday). Somework on the baffles and riveted one cowl hinge on Sunday afternoon.
Test Flight with Bob Cole at the controls
Started work on baffle behind flywheel. I still have some of the fixings to complete, but they are almost complete.
Test Flight with Bob Cole at the controls
Still working on baffles. Front baffle floors - completed both sides. Started on front baffle behind flywheel..
Test Flight with Bob Cole at the controls
Continued work on baffles - the front inlet is tricky, partly due to the plans are a little sketchy (really they are drawings!) in this area.
Empannage Fitting
Now I have the cowls fitted I am fitting the baffles - a tricky job to get correct.
Test Flight with Bob Cole at the controls
Cutting the cowl created lots of dust in the workshop so I moved the RV outside and gave the workshop a complete clean and tidy. Back in the workshop I started planning the baffle fitting, by creating profile templates of the cowl.
17th March 2006
Drove to Portsmouth this evening to get some West Systems epoxy for the cowl and canopy - I will be adding a page with what quantites of the West System you require..
Empannage Fitting
Trimmed sides of the of the cowls to match the top and bottom sections. Cut and fitted lower half of hinge.
Empannage Fitting
Cut & fitted lower cowl side fixings, and trimmed around the front this evening. Have marked cut between upper & lower cowl ready for tomorrow evening.
Test Flight with Bob Cole at the controls
Fitting lower cowl. There may be a problem with the mixture lever catching on the cowl. Checked space around the fuel injection servo for the airbox.
Empannage Fitting
Started fitting top cowl to the fuse today - Sunday. Pleased with progress went quicker and better than I expected.
Test Flight with Bob Cole at the controls
Fitted spinner today..
Test Flight with Bob Cole at the controls
BIG DAY. The Propeller arrived from Vans today, with Jo's help I had it fitted by the evening.
Test Flight with Bob Cole at the controls
Mark came over to drop Josie off to see Jo. Well I could not miss out on the chance of a handy pair of hands. I soon had Mark to work helping fit the wheel spats, knew they would be difficult by myself. Just over tow hours on the first, them 35mins on the second! Finished at 11.30pm in time for Mark to take Josie home.
Empannage Fitting
Decided to box in the audio connections on the PAX side. I placed them to the side rather than under the panel to keep the wires to the side. The headset connections could have been placed in the rear. But I wanted to keep the cable runs as short as possible, and if the pilot position has a problem it's easy to connect to the PAX position.
Empannage Fitting
Aileron rods & rod ends.
Empannage Fitting
Fuse interior.
Empannage Fitting
Pedal fitting.
1st March 2006
First fitting of the centre cabin cover and fuel tap housing.
 
Empannage Fitting
Still running wires and connecting things up! But I am close to completing the work. Wiring in the trim and stick control switches, and adding avionics master.
Empannage Fitting
Even more wiring this weekend, but I think I have the bulk of it done now. I have the wiring for the elevator and aileron trim controls and display's into the Advanced analogue unit. Saturday afternoon, friend and fellow RV builder Jerry came over to see how I was getting on. I was really usfull as some areas I was unsure of the best position to place things. So it was worth asking another builder - and somebody who has flown his RV for more than four years.
Empannage Fitting
Another big evening... I powered the whole panel up this evening. It's the first time I have powered the Advanced AF2500.
Empannage Fitting
Spent this week working on the wiring.
21st February 2006
Tested radio today, working.
Empannage Fitting
19th February 2006
A really big day today - Sunday. I spent nearly all day working on the intercom wiring, I have it all connected now - apart from feed to and from radio. The big part of today is - I applied the first power to the RV testing the intercom.
Empannage Fitting
Started work on intercom wiring. The intercom is stereo, with stereo music input. So there is lots of wire and connections.
Empannage Fitting
Finished remaking the instrument panel. Continued this week working on the instrument panel adding the P2 trim switch and heater control. I have run a lot of the wiring now it's time to start connecting things up. Spent most of this week working on the wiring - Radio, transponder and some work on the Advanced Engine Monitor (manifold, fuel tanks & RPM sensors). Spent all my evenings this week working on the wiring.
Empannage Fitting
A replacement instrument panel arrived this week so I decide to use this weekend to get the new panel made. I was out in good time this morning and got on with making the replacement. I cut the bottom angle off the original so I could sit it on the replacement panel using it as a pattern. The extra hole where I had planned to fit the compas will no longer happen. I'm now going to fit one to the top of the panel. I did it, in one day, lots of cutting and drilling - and a big heap of swarf!!
Empannage Fitting
I had already fitted most of the baffle kit - to check it was compatible with the Superior engine. Decided it was time to progress the fitting, I can't do it all as I need the cowls fitted to govern the angles of the air inlet. I have been able to cut most of the parts. While working on the engine I decided to try the alternator belt. I tried three different sizes and still don't have one fitting as I would like. As my shipment arrived from Vans I fitted the new length throttle and Mixture control.
Empannage Fitting
Continued fitting parts to engine - wiring. CHT sensors to the AF-2500 engine monitor. Fitted starter cable and Manifold sensor wiring.
Mixed bag over this week, still disappointed with myself for messing up the instrument panel. I have fitted the manifold presure sensor on the firewall. The RPM pickup to the magneto, and started planning the fitting of the trim wiring and governor.
 
Empannage Fitting
Not a good evening. Last night I put the servo on, but as the cables are short I decided to continue with something else. The instrument panel. My plan was to finish fitting a couple of items. The compass, the P2 trim switch and heater control. What a bl&*dy disaster! Cutting the compass hole I put the hole cutter on the wrongway round and bent the instrument panel.
Empannage Fitting
Jade have delivered the new fuel servo. This reverses the mixture control so the lever can operate from the top. This enables it to clear the airbox. Unfortunatly the mixture control cable is too short and the throttle control is slightly taught so I may get a longer throttle also.
What's happened to my project updates?
Empannage Fitting
Fitted the radio aerial.
Test Flight with Bob Cole at the controls
Fitted position for pilot side com connectors.
Test Flight with Bob Cole at the controls
Fitting the intercom/radio jacks. I decided to modify the air vent mount - extend it down to take the headset connections. Plus on the PAX side music input and a power connector.
Test Flight with Bob Cole at the controls
Friday 13th, perhaps I should have stayed out of the workshop! Decided to fit the intercom today as I need to plan the wire routes and headset positions. It didn't go very well, as I broke one of the screws off in the case of the intercom and scratched the face plate.
Empannage Fitting
My order from Vans arrived today, so I could finally fix the fuel line. Finally fitted the aileron trim servo, final fit strobe power pack.
Empannage Fitting
Continued work on the wiring - routed wires for rear strobe and nav light Organised wiring around spar and routed wing nav lights and landing light. Fitted static line in rear fuse to intrument panel. Fitted elevator trim wire in rear fuse. Fitted connectors to aileron trim servo. Started work on fitting stobe power pack.
Empannage Fitting
In the workshop for the afternoon decided to build the mount for the Dynon EDC-D10A External Magnetic Sensor Probe. I have decided to mount it behind the baggage compartment. The Magnetic sensor must be mounted as closely aligned with the D100. It should be mounted with the long axis parallel to the wings, the electrical connector facing toward the front of the plane. The pitch, roll and yaw must be within a degree.
6th January 2006
Placed parts order with Vans, intercom and some other odd parts I need. Checked on my Prop shipment date, it's not due to ship until 27th Feburary. really wish I had ordered it earlier.
Empannage Fitting
Connecting sensors to AF-2500. Fitting aerial leads for transponder and radio. Starting work on cowl - spinner, with the intention of fitting the spinner to align the cowl. BUT I discovered a problem with my plan.
3rd January 2006
More work on the wiring - fitted 60A alt CB. Wired master switch, connected master and start relays. Started fitting connectors to transponder aerial.
Empannage Fitting
Almost a full day in the workshop today - fitted wiring for starter, Nav, Strobe and Landing lights. Radio & transponder power. Flap switch & alternator. Started wiring in AF-2500 engine monitor.
Empannage Fitting
1st January 2006
Christmas is over, and Jo has got me lots of bits for my RV project and some tools - she is great. Topcoat pain.
 

Images & text copyright GAPilot & Go-7. This mail is not connected to Vans Aircraft Inc. The contents of this mail is the opinion of the author, not Vans Aircarft, PFA, CAA of FAA. Please check all information is correct before you act upon it.